We have made the move from Blogger to our own install of WordPress. My blog continues over there.
Please go to: http://joysblog.glassnebula.com/
Thank you!!!
Joy
Monday, May 25, 2009


Tuesday, April 21, 2009
Blown Glass Rocketship Awards
While we were at the National Space Sypmosium, a next door exhibitor asked if we could put together some small awards for students. The catch was he didn't have much time. I came back to the studio and looked around for something that I had already in stock that would do well as awards, but I only had two or three of each appropriate thingie, and he needed 5 - 4 regular sized and one a bit larger.
We decided to go ahead and make 5 new pieces, using our smaller rocketship card holder as a model. Since the rockets would be a little bigger, it was not the best choice to do them at the torch. It would be quicker to fire up the larger furnace and blow them on the big pipes. Then we could crank out a number of them relatively quickly.
First, I needed to get the bases ready, so we knew how large of a rocketship would fit each. I have a number of three inch bevel glass pieces that were molded over a pebbly surface. This rounds the edges and makes each piece unique and interesting, not just a flat piece of glass. The guy wanted them to be etched with the symposium and date, so I masked each off and prepared them for etching.
 The lower section is where the etching mask is. You can't see the thin type in these pictures. Then I use blue painters tape to protect the rest of each piece from getting any overblast when I'm etching. I have a medium sized sandblasting cabinet that I use with a compressor, so all five discs went into that at once. I blasted each separately, but with all that grit flying around, if the pieces are not completely protected, they would most definitely get marked up.
When done, I cleaned them up and saw that a 4-5 inch rocketship with fins would fit beautifully on top. So we fired the furnaces and went in for a day or two of blowing rocketship shapes.
 Here is BJ with one of the nearly finished rockets on the end of the blowpipe. Usually, he and I switch on and off from being the blower or being the gaffer (person in charge, and doing the shaping). But I didn't want to throw him off his rythym, so I let him be the gaffer the whole day. He had the hang of making the right shape, and we wanted them to be very similar to each other. Once he got done with each, he'd crack them off the pipe and into the annealer to cool down overnight.
Before blowing each day, I did some work at the torch making fins. Torchwork is much smaller and more precise, so I could get a heated bit of clear glass, mash it into a button and then pull a fin from the round shape. It's a little more difficult to make these match each other, but I get into the swing of it.
The next day, the rockets come out of the annealer and the fins come out of the little blue kiln and I could carve them to fit each other and epoxy them together. The scotch tape you'll see is just to hold the pieces from sliding until they set up. They will have to sit for an entire day before they set up enough to handle.
 Here are the five little rockets, sitting on a triangle of "rocket blast" glass with their little fins strapped to them. I have the cup of epoxy sitting next to them so I can keep checking it instead of futzing with the rockets themselves. You can also see part of my drafting table, with my watercolors and watercolor pads. It's very interesting to do such a range of art techniques, but it makes for messy tables sometimes. OK, most of the time.....
 Here is one of the rocketships in my hand for scale. This is one of the smaller ones. Will make a very nice award!
 And the finished piece! Yayy!!! The etching is nicely visible and the rocketships have wonderful bubbles stretched over them. They look like little windows. I'm quite proud of these little steampunk rocketships! We have already thought of a few different techniques to make the flame join in a little better, and I think the next ones will have three fins instead of two, but that would have infringed on the inscription of this one.
What do you think? suggestions? other ideas for us to try? Market places for them? You want one?
Peace,
Joy
We decided to go ahead and make 5 new pieces, using our smaller rocketship card holder as a model. Since the rockets would be a little bigger, it was not the best choice to do them at the torch. It would be quicker to fire up the larger furnace and blow them on the big pipes. Then we could crank out a number of them relatively quickly.
First, I needed to get the bases ready, so we knew how large of a rocketship would fit each. I have a number of three inch bevel glass pieces that were molded over a pebbly surface. This rounds the edges and makes each piece unique and interesting, not just a flat piece of glass. The guy wanted them to be etched with the symposium and date, so I masked each off and prepared them for etching.
 The lower section is where the etching mask is. You can't see the thin type in these pictures. Then I use blue painters tape to protect the rest of each piece from getting any overblast when I'm etching. I have a medium sized sandblasting cabinet that I use with a compressor, so all five discs went into that at once. I blasted each separately, but with all that grit flying around, if the pieces are not completely protected, they would most definitely get marked up.
When done, I cleaned them up and saw that a 4-5 inch rocketship with fins would fit beautifully on top. So we fired the furnaces and went in for a day or two of blowing rocketship shapes.
 Here is BJ with one of the nearly finished rockets on the end of the blowpipe. Usually, he and I switch on and off from being the blower or being the gaffer (person in charge, and doing the shaping). But I didn't want to throw him off his rythym, so I let him be the gaffer the whole day. He had the hang of making the right shape, and we wanted them to be very similar to each other. Once he got done with each, he'd crack them off the pipe and into the annealer to cool down overnight.
Before blowing each day, I did some work at the torch making fins. Torchwork is much smaller and more precise, so I could get a heated bit of clear glass, mash it into a button and then pull a fin from the round shape. It's a little more difficult to make these match each other, but I get into the swing of it.
The next day, the rockets come out of the annealer and the fins come out of the little blue kiln and I could carve them to fit each other and epoxy them together. The scotch tape you'll see is just to hold the pieces from sliding until they set up. They will have to sit for an entire day before they set up enough to handle.
 Here are the five little rockets, sitting on a triangle of "rocket blast" glass with their little fins strapped to them. I have the cup of epoxy sitting next to them so I can keep checking it instead of futzing with the rockets themselves. You can also see part of my drafting table, with my watercolors and watercolor pads. It's very interesting to do such a range of art techniques, but it makes for messy tables sometimes. OK, most of the time.....
 Here is one of the rocketships in my hand for scale. This is one of the smaller ones. Will make a very nice award!
 And the finished piece! Yayy!!! The etching is nicely visible and the rocketships have wonderful bubbles stretched over them. They look like little windows. I'm quite proud of these little steampunk rocketships! We have already thought of a few different techniques to make the flame join in a little better, and I think the next ones will have three fins instead of two, but that would have infringed on the inscription of this one.
What do you think? suggestions? other ideas for us to try? Market places for them? You want one?
Peace,
Joy
Sunday, April 12, 2009
Clueless People? Or Is It Just Me??

We recently had a booth set up at the National Space Symposium. We are usually the only artists that have a booth - the anomoly. We do a lot of work for the Space Foundation, which runs the symposium, including moving the large sculpture that goes on display for this symposium, so we have an exhibit in the hall during the week while we're taking care of their big glass sculpture.
So we set up our booth. As you can see, we have big space art (or SF art perhaps) on the back panel. We also have space art on the front of the display cabinet. We have a large solar system mobile hanging from the sky. We have some of our awards displayed - Lifetime Achievement for both Space Foundation, and for GeoSpatial Intelligence Foundation. The back table has our portfolio with 48 images of space art, and of course, the huge back panel says ART on it.
Why is it then, and it never fails, that we get people coming through the exhibit hall, they stop, give us a confounded look and then ask one of two questions:
1. "What do you do?" --- Uhhh..... can you read the 18 inch tall letters on this panel here? ART? It has taken me numerous years to come up with some sort of answer that doesn't beg to have " , bonehead" attached to the end of it. So I detail out what we do - "Illustration, Mission artwork, Concept art, and also glass sculptures - large for corporate lobbies, but also smaller for gifts, and awards."
This will prompt the second question: (sometimes, they skip the first and go directly to the second):
2. "What does this have to do with Space?" --- wow... ummm and again, the "bonehead" word leaps into my mind as I look around the booth at EVERYTHING being Space related. This year, I came up with this response. Tell me what you think.
"For all the companies here, not every one of them will need a rocket, but every single one will need artwork. That's what we have to do with Space. We provide the artwork that these companies need."
(" , bonehead.")
Is it just me? Am I in an alternate universe? Can people really not make the leap that other types of businesses can be involved in what their own focus is? Is that it? They are just so narrowly focused on their own little piece of the space industry that they can't widen their scope for even an instant?
We get these questions multiple time every day of the conference, every year. I should say I expect it now, but each time it happens, it still stuns me and I have to pick my chin up off the table before I can answer. What would you say? Do these questions make sense to begin with? Am I too narrowly focused on my own? Are they clueless, or is it just me?
Peace,
Joy
Monday, April 06, 2009
Deep Carving in Glass
I wanted to experiment with my sandblasting and deep carving on glass. My cast glass pieces are usually in the 3/8-1/2 inch thick range, with the colors swirling through the entire depth of the piece. This would make for some great carving, as some of the colors would be opened up, while others would remain untouched.
Since I was getting ready for a space conference, I decided to go with a spacey design. I had a section of glass that for all the world looks like boiling fire, so chose to carve a rocketship taking off into the front of it. This would be just a display piece, as an example of the type of work we can do on countertops, sinks, doors, etc.
So, first I had to come up with an idea. I chose to make a stylized rocket, like the '50's rockets with fins.
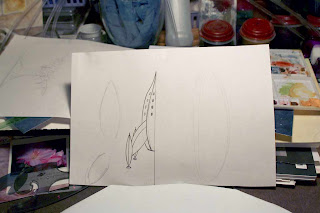
This is my initial sketch. Since the sides had to mirror each other, I mostly just worked up one half.
 I then worked on the flame blast that would go under the rocket. The piece of glass I have is triangular shaped, so the curlie-Q's contrasted that hard edge wonderfully.
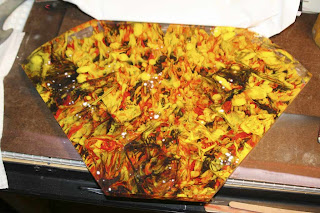 Here is the actual glass, all polished, trimmed and ready to be covered with the resist so that the sandblasting only affects where I want it to. It's a gorgeous piece with reds, yellows and blacks bubbling up and crashing through the surface. As the piece finished casting, the colors set and the surface flattened down to be completely smooth - a perfect surface to etch and carve into. It is about 18 inches across by about 16 inches deep, weighing about 15 pounds.
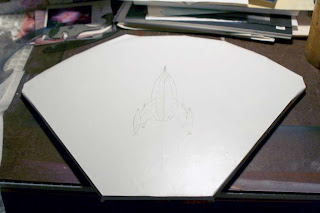 I have now placed the vinyl sticky resist covering the front of the glass. I'll need another piece on the back and sides so it doesn't get scratched while I'm working on it. I've transfered the sketch of the rocket and flame curlies onto the resist to guide my cutting by hand.
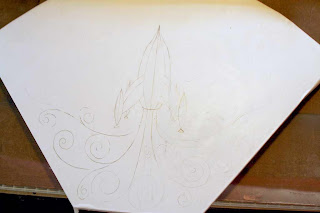 I've transfered the sketch in great detail and have now started cutting the resist by hand. It's a thin vinyl and I'm using a very sharp scalpel, but it makes my hands sore making sure I keep to the pattern exactly. I cut on every line, with the curlies getting cut on each side so that there is a thin curly line of glass exposed.
 When I finish cutting each line, I peel off the beginning sections. If I were surface etching, I'd peel the whole design off and do a fine sandblast over the exposed areas, but s ince I'm deep carving, I can only do a section at a time so that the sections adjoining will be a different depth to the ones I've carved before.
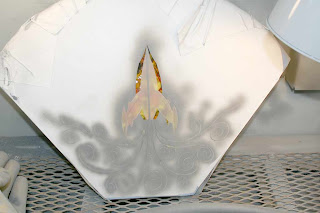 Here, I've sandblasted the curlie-Q's and part of the rocket. If you look closely, you can see that the interior sections of the rocket have been sandblasted, but the exterior sections are still smooth shiny glass, and the very center line still has the mask over it. Now, when I blast the exterior sections, they'll go a little deep, but the interior will go even deeper, leaving a line between the two on each side. After that, I'll pull the center strip and give it some more blasting. This will result in a four-level carved rocket.
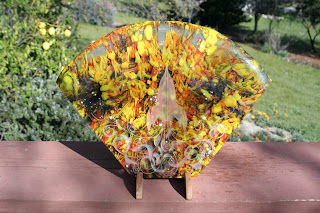 Here is the finished piece with the carved rocket subtly engraved into the front. It would make a perfect top stone for a fireplace surround.
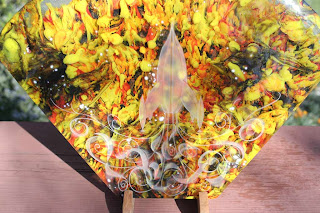 This is a close up of the rocket carving. You can see multiple levels in the rocket itself, plus multiple levels in the curlie-Q flames. It turned out extremely nice, with no oversprays, no gaffes. It took a day for the sketching and mask cutting, but only a few hours for the actual carving.
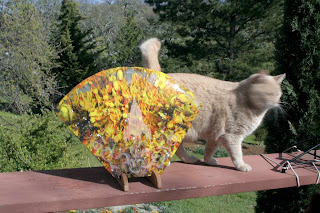 This is my curly-tailed kitten, Dobby. Couldn't for the world get him to stop moving long enough for the photo. He's a wiggle worm!
What would you use this piece for? Counter insert? Cutting board? Fireplace tile? Freestanding art? Give me some ideas!
Since I was getting ready for a space conference, I decided to go with a spacey design. I had a section of glass that for all the world looks like boiling fire, so chose to carve a rocketship taking off into the front of it. This would be just a display piece, as an example of the type of work we can do on countertops, sinks, doors, etc.
So, first I had to come up with an idea. I chose to make a stylized rocket, like the '50's rockets with fins.

This is my initial sketch. Since the sides had to mirror each other, I mostly just worked up one half.
 I then worked on the flame blast that would go under the rocket. The piece of glass I have is triangular shaped, so the curlie-Q's contrasted that hard edge wonderfully.
 Here is the actual glass, all polished, trimmed and ready to be covered with the resist so that the sandblasting only affects where I want it to. It's a gorgeous piece with reds, yellows and blacks bubbling up and crashing through the surface. As the piece finished casting, the colors set and the surface flattened down to be completely smooth - a perfect surface to etch and carve into. It is about 18 inches across by about 16 inches deep, weighing about 15 pounds.
 I have now placed the vinyl sticky resist covering the front of the glass. I'll need another piece on the back and sides so it doesn't get scratched while I'm working on it. I've transfered the sketch of the rocket and flame curlies onto the resist to guide my cutting by hand.
 I've transfered the sketch in great detail and have now started cutting the resist by hand. It's a thin vinyl and I'm using a very sharp scalpel, but it makes my hands sore making sure I keep to the pattern exactly. I cut on every line, with the curlies getting cut on each side so that there is a thin curly line of glass exposed.
 When I finish cutting each line, I peel off the beginning sections. If I were surface etching, I'd peel the whole design off and do a fine sandblast over the exposed areas, but s ince I'm deep carving, I can only do a section at a time so that the sections adjoining will be a different depth to the ones I've carved before.
 Here, I've sandblasted the curlie-Q's and part of the rocket. If you look closely, you can see that the interior sections of the rocket have been sandblasted, but the exterior sections are still smooth shiny glass, and the very center line still has the mask over it. Now, when I blast the exterior sections, they'll go a little deep, but the interior will go even deeper, leaving a line between the two on each side. After that, I'll pull the center strip and give it some more blasting. This will result in a four-level carved rocket.
 Here is the finished piece with the carved rocket subtly engraved into the front. It would make a perfect top stone for a fireplace surround.
 This is a close up of the rocket carving. You can see multiple levels in the rocket itself, plus multiple levels in the curlie-Q flames. It turned out extremely nice, with no oversprays, no gaffes. It took a day for the sketching and mask cutting, but only a few hours for the actual carving.
 This is my curly-tailed kitten, Dobby. Couldn't for the world get him to stop moving long enough for the photo. He's a wiggle worm!
What would you use this piece for? Counter insert? Cutting board? Fireplace tile? Freestanding art? Give me some ideas!
Wednesday, March 18, 2009
How Fast Can You Paint?
I have never been a fast painter. I see friends who bang out piece after piece during a day. Why can't I get the hang of trusting what I feel and slapping it down? Instead, I tend to linger, plot out the strokes, the colors. In the end, I often end up ruining a perfectly good painting by overworking it. Being a good artist is also knowing when to quit, so I guess I'm not such a good artist sometimes.
But the trouble is that it's the sections of the paintings... One will be completely done while another is barely started. So I guess my brain says that since I'm still working on the painting, I can go back to the done section, and that's where the trouble comes in.
I need more practice at doing quick works. When I was in college, we did a lot of gesture drawings. The teacher would put us on the clock, giving us 5 minutes, then 2, then 1 to do full page (18 x 24 inch) drawings. You didn't have time to think about stuff too much. You were forced to quickly reconcile what you were looking at and get your hand moving to capture it. And it got me a lot more comfortable with laying down rich, thick lines instead of the barely visible itty bitty sketches I was doing before.
I need to do that with my watercolors. Some of the pieces I've shown here were done fairly quickly, so I know I have it in me to trust what I'm doing, I just need to convince the rest of my head to trust as well.
So, I am going to start a series of small paintings, called ACEOs (art cards, the size of baseball cards) where I am going to do more gestural type works.
I'll start posting them as I get them done - first one in three weeks! Just kidding!!!! first one tomorrow at the latest is what I'm hoping for.
What tips do *you* have for speeding up artwork? For trusting your own instincts? Help me out!
Peace,
Joy
But the trouble is that it's the sections of the paintings... One will be completely done while another is barely started. So I guess my brain says that since I'm still working on the painting, I can go back to the done section, and that's where the trouble comes in.
I need more practice at doing quick works. When I was in college, we did a lot of gesture drawings. The teacher would put us on the clock, giving us 5 minutes, then 2, then 1 to do full page (18 x 24 inch) drawings. You didn't have time to think about stuff too much. You were forced to quickly reconcile what you were looking at and get your hand moving to capture it. And it got me a lot more comfortable with laying down rich, thick lines instead of the barely visible itty bitty sketches I was doing before.
I need to do that with my watercolors. Some of the pieces I've shown here were done fairly quickly, so I know I have it in me to trust what I'm doing, I just need to convince the rest of my head to trust as well.
So, I am going to start a series of small paintings, called ACEOs (art cards, the size of baseball cards) where I am going to do more gestural type works.
I'll start posting them as I get them done - first one in three weeks! Just kidding!!!! first one tomorrow at the latest is what I'm hoping for.
What tips do *you* have for speeding up artwork? For trusting your own instincts? Help me out!
Peace,
Joy
Saturday, March 07, 2009
Next for the Orrery Project
Previous posts have focused on the rocket that is the center column for our orrery. The one pictured here doesn't have the bottom section with the fins, but our new one does. Now that the rocket has been carved and the holes bored into it to accept the drive tubes, it can be put aside for a bit and we move on to the next section - The arms.
 You can see here that each planet has its own arm. The rocket is cut into little sections so that each arm will spin freely on a bearing between the rocket sections. So it's time to craft the arms. While the arms are being built, the planets can also be blown. If we have some good weather, we'll get going on that too.
Back to the arms. They need to be very strong - the piece is going into a college, where no doubt, there will be drunken college students attempting to take Jupiter home with them. A lot of thought and design has gone into this orrery to make it "Student-Proof", as best we can anyway... Since they're pretty thin, we've chosen to make the arms out of carbon fiber (what they make jet fighters out of, and the new SpaceShip One) It's extremely sturdy, and very lightweight. Lightweight matters because the planets themselves, being blown glass, are going to be on the heavy side and we want to make sure all that weight off of one side of the rocket doesn't screw up its ability to spin freely, so wherever we can make something lighter, it's a good thing.
But how do we make an arm from this mystical "Carbon Fiber"? We can get CF in various forms from online stores that sell to homemade airplane makers, or car hobbiests. It comes in rod, tube, tape or a fabric. Hmmm.... Fabric.... I used to work professionally as a costume designer for theatres, and have worked with fabric all my life. I could use my fabric knowledge with this new technique! How hard could it be?
You can see here, the feather spars I built for our mobile projects. The longest is about 16 feet long! The largest is about 4 inches wide by 3/4 inch thick at the tube. Only about an 1/8 inch thick on the feather.

Now here is a closeup of those feather spars before I did the final trim work on them. You can see that it is a cross weave fabric. It's a very thick fabric, and the weave is loose so it tends to wiggle all over the place. It is also highly toxic, so gloves, goggles and a mask are required. I first make a long pattern of what the full piece needs to be and then carefully cut the CF to match.
The feather shape is laid out on plastic in a specially designed mold that will hold it in its "feather" shape until it's set. It is wrapped around a central tube, which gives it stability and also a way for us to pass the wiring needed for each planet, and then soaked with a two part epoxy glue. The plastic is then rolled over the top, sealing the piece inside. I then squeegee out the excess glue and smooth it under the plastic so that there aren't any bubbles or dry spots. I add weights to hold it in the tight curve shape. Then it's just a matter of waiting for the epoxy to set up. I check on it often during the next 12 hours to make sure nothing is coming loose or slipping. I will use this same technique for the orrery arms, but on a smaller scale. The longest arm is only 3 feet long, with a gentle curve to it, and fairly thin - it will be under 3/8 inch thick. I plan on squeezing the pieces towards the inner part of the curve to that when I trim and clean it up, it won't be as visible as it would be on the outside where people are seeing it more.
That's the plan. We'll see how it goes! How hard could it be?
Peace,
Joy
 You can see here that each planet has its own arm. The rocket is cut into little sections so that each arm will spin freely on a bearing between the rocket sections. So it's time to craft the arms. While the arms are being built, the planets can also be blown. If we have some good weather, we'll get going on that too.
Back to the arms. They need to be very strong - the piece is going into a college, where no doubt, there will be drunken college students attempting to take Jupiter home with them. A lot of thought and design has gone into this orrery to make it "Student-Proof", as best we can anyway... Since they're pretty thin, we've chosen to make the arms out of carbon fiber (what they make jet fighters out of, and the new SpaceShip One) It's extremely sturdy, and very lightweight. Lightweight matters because the planets themselves, being blown glass, are going to be on the heavy side and we want to make sure all that weight off of one side of the rocket doesn't screw up its ability to spin freely, so wherever we can make something lighter, it's a good thing.
But how do we make an arm from this mystical "Carbon Fiber"? We can get CF in various forms from online stores that sell to homemade airplane makers, or car hobbiests. It comes in rod, tube, tape or a fabric. Hmmm.... Fabric.... I used to work professionally as a costume designer for theatres, and have worked with fabric all my life. I could use my fabric knowledge with this new technique! How hard could it be?
You can see here, the feather spars I built for our mobile projects. The longest is about 16 feet long! The largest is about 4 inches wide by 3/4 inch thick at the tube. Only about an 1/8 inch thick on the feather.

Now here is a closeup of those feather spars before I did the final trim work on them. You can see that it is a cross weave fabric. It's a very thick fabric, and the weave is loose so it tends to wiggle all over the place. It is also highly toxic, so gloves, goggles and a mask are required. I first make a long pattern of what the full piece needs to be and then carefully cut the CF to match.
The feather shape is laid out on plastic in a specially designed mold that will hold it in its "feather" shape until it's set. It is wrapped around a central tube, which gives it stability and also a way for us to pass the wiring needed for each planet, and then soaked with a two part epoxy glue. The plastic is then rolled over the top, sealing the piece inside. I then squeegee out the excess glue and smooth it under the plastic so that there aren't any bubbles or dry spots. I add weights to hold it in the tight curve shape. Then it's just a matter of waiting for the epoxy to set up. I check on it often during the next 12 hours to make sure nothing is coming loose or slipping.
 I will use this same technique for the orrery arms, but on a smaller scale. The longest arm is only 3 feet long, with a gentle curve to it, and fairly thin - it will be under 3/8 inch thick. I plan on squeezing the pieces towards the inner part of the curve to that when I trim and clean it up, it won't be as visible as it would be on the outside where people are seeing it more.
That's the plan. We'll see how it goes! How hard could it be?
Peace,
Joy
Sunday, March 01, 2009
More Little Watercolors
I've gotten a great response for the little watercolor I posted of Shadow, so here is another one I did a bit ago. This is of Larry, our beautiful Maine Coon tuxedo boy. He is from a kaboodle of 5 abandoned kittens we rescued (yes, we're suckers for cuties....)
 This piece is only 6 inches wide, and really captures his eyes. I really like the super closeups, if I can get them to pose for that long, but Larry happens to be one of the most easygoing cats I've ever had, so it's easy. I just have to tell him he's adorable, and he flops down and goes into some really cute pose.
Since my watercolors are only personal projects so far, I don't often get time to work on them. Paying jobs come first. Today, it's raining and dreary though, so maybe I'll take some time, get a mug of cocoa, put on my slippers and lose myself in some little paintings.
Yes, that sounds like a really good plan.
Please post a comment here and on facebook. I'd love to hear what you think, suggestions....
Peace,
Joy
 This piece is only 6 inches wide, and really captures his eyes. I really like the super closeups, if I can get them to pose for that long, but Larry happens to be one of the most easygoing cats I've ever had, so it's easy. I just have to tell him he's adorable, and he flops down and goes into some really cute pose.
Since my watercolors are only personal projects so far, I don't often get time to work on them. Paying jobs come first. Today, it's raining and dreary though, so maybe I'll take some time, get a mug of cocoa, put on my slippers and lose myself in some little paintings.
Yes, that sounds like a really good plan.
Please post a comment here and on facebook. I'd love to hear what you think, suggestions....
Peace,
Joy