We have made the move from Blogger to our own install of WordPress. My blog continues over there.
Please go to: http://joysblog.glassnebula.com/
Thank you!!!
Joy
Monday, May 25, 2009
Tuesday, April 21, 2009
Blown Glass Rocketship Awards
While we were at the National Space Sypmosium, a next door exhibitor asked if we could put together some small awards for students. The catch was he didn't have much time. I came back to the studio and looked around for something that I had already in stock that would do well as awards, but I only had two or three of each appropriate thingie, and he needed 5 - 4 regular sized and one a bit larger.
We decided to go ahead and make 5 new pieces, using our smaller rocketship card holder as a model. Since the rockets would be a little bigger, it was not the best choice to do them at the torch. It would be quicker to fire up the larger furnace and blow them on the big pipes. Then we could crank out a number of them relatively quickly.
First, I needed to get the bases ready, so we knew how large of a rocketship would fit each. I have a number of three inch bevel glass pieces that were molded over a pebbly surface. This rounds the edges and makes each piece unique and interesting, not just a flat piece of glass. The guy wanted them to be etched with the symposium and date, so I masked each off and prepared them for etching.
 The lower section is where the etching mask is. You can't see the thin type in these pictures. Then I use blue painters tape to protect the rest of each piece from getting any overblast when I'm etching. I have a medium sized sandblasting cabinet that I use with a compressor, so all five discs went into that at once. I blasted each separately, but with all that grit flying around, if the pieces are not completely protected, they would most definitely get marked up.
When done, I cleaned them up and saw that a 4-5 inch rocketship with fins would fit beautifully on top. So we fired the furnaces and went in for a day or two of blowing rocketship shapes.
 Here is BJ with one of the nearly finished rockets on the end of the blowpipe. Usually, he and I switch on and off from being the blower or being the gaffer (person in charge, and doing the shaping). But I didn't want to throw him off his rythym, so I let him be the gaffer the whole day. He had the hang of making the right shape, and we wanted them to be very similar to each other. Once he got done with each, he'd crack them off the pipe and into the annealer to cool down overnight.
Before blowing each day, I did some work at the torch making fins. Torchwork is much smaller and more precise, so I could get a heated bit of clear glass, mash it into a button and then pull a fin from the round shape. It's a little more difficult to make these match each other, but I get into the swing of it.
The next day, the rockets come out of the annealer and the fins come out of the little blue kiln and I could carve them to fit each other and epoxy them together. The scotch tape you'll see is just to hold the pieces from sliding until they set up. They will have to sit for an entire day before they set up enough to handle.
 Here are the five little rockets, sitting on a triangle of "rocket blast" glass with their little fins strapped to them. I have the cup of epoxy sitting next to them so I can keep checking it instead of futzing with the rockets themselves. You can also see part of my drafting table, with my watercolors and watercolor pads. It's very interesting to do such a range of art techniques, but it makes for messy tables sometimes. OK, most of the time.....
 Here is one of the rocketships in my hand for scale. This is one of the smaller ones. Will make a very nice award!
 And the finished piece! Yayy!!! The etching is nicely visible and the rocketships have wonderful bubbles stretched over them. They look like little windows. I'm quite proud of these little steampunk rocketships! We have already thought of a few different techniques to make the flame join in a little better, and I think the next ones will have three fins instead of two, but that would have infringed on the inscription of this one.
What do you think? suggestions? other ideas for us to try? Market places for them? You want one?
Peace,
Joy
Sunday, April 12, 2009
Clueless People? Or Is It Just Me??

We recently had a booth set up at the National Space Symposium. We are usually the only artists that have a booth - the anomoly. We do a lot of work for the Space Foundation, which runs the symposium, including moving the large sculpture that goes on display for this symposium, so we have an exhibit in the hall during the week while we're taking care of their big glass sculpture.
So we set up our booth. As you can see, we have big space art (or SF art perhaps) on the back panel. We also have space art on the front of the display cabinet. We have a large solar system mobile hanging from the sky. We have some of our awards displayed - Lifetime Achievement for both Space Foundation, and for GeoSpatial Intelligence Foundation. The back table has our portfolio with 48 images of space art, and of course, the huge back panel says ART on it.
Why is it then, and it never fails, that we get people coming through the exhibit hall, they stop, give us a confounded look and then ask one of two questions:
1. "What do you do?" --- Uhhh..... can you read the 18 inch tall letters on this panel here? ART? It has taken me numerous years to come up with some sort of answer that doesn't beg to have " , bonehead" attached to the end of it. So I detail out what we do - "Illustration, Mission artwork, Concept art, and also glass sculptures - large for corporate lobbies, but also smaller for gifts, and awards."
This will prompt the second question: (sometimes, they skip the first and go directly to the second):
2. "What does this have to do with Space?" --- wow... ummm and again, the "bonehead" word leaps into my mind as I look around the booth at EVERYTHING being Space related. This year, I came up with this response. Tell me what you think.
"For all the companies here, not every one of them will need a rocket, but every single one will need artwork. That's what we have to do with Space. We provide the artwork that these companies need."
(" , bonehead.")
Is it just me? Am I in an alternate universe? Can people really not make the leap that other types of businesses can be involved in what their own focus is? Is that it? They are just so narrowly focused on their own little piece of the space industry that they can't widen their scope for even an instant?
We get these questions multiple time every day of the conference, every year. I should say I expect it now, but each time it happens, it still stuns me and I have to pick my chin up off the table before I can answer. What would you say? Do these questions make sense to begin with? Am I too narrowly focused on my own? Are they clueless, or is it just me?
Peace,
Joy
Monday, April 06, 2009
Deep Carving in Glass
I wanted to experiment with my sandblasting and deep carving on glass. My cast glass pieces are usually in the 3/8-1/2 inch thick range, with the colors swirling through the entire depth of the piece. This would make for some great carving, as some of the colors would be opened up, while others would remain untouched.
Since I was getting ready for a space conference, I decided to go with a spacey design. I had a section of glass that for all the world looks like boiling fire, so chose to carve a rocketship taking off into the front of it. This would be just a display piece, as an example of the type of work we can do on countertops, sinks, doors, etc.
So, first I had to come up with an idea. I chose to make a stylized rocket, like the '50's rockets with fins.

This is my initial sketch. Since the sides had to mirror each other, I mostly just worked up one half.
 I then worked on the flame blast that would go under the rocket. The piece of glass I have is triangular shaped, so the curlie-Q's contrasted that hard edge wonderfully.
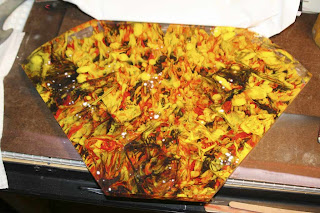 Here is the actual glass, all polished, trimmed and ready to be covered with the resist so that the sandblasting only affects where I want it to. It's a gorgeous piece with reds, yellows and blacks bubbling up and crashing through the surface. As the piece finished casting, the colors set and the surface flattened down to be completely smooth - a perfect surface to etch and carve into. It is about 18 inches across by about 16 inches deep, weighing about 15 pounds.
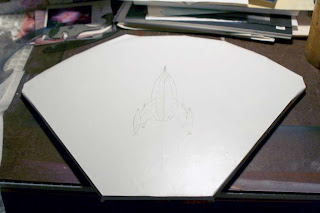 I have now placed the vinyl sticky resist covering the front of the glass. I'll need another piece on the back and sides so it doesn't get scratched while I'm working on it. I've transfered the sketch of the rocket and flame curlies onto the resist to guide my cutting by hand.
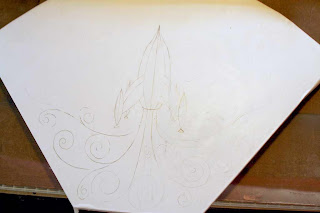 I've transfered the sketch in great detail and have now started cutting the resist by hand. It's a thin vinyl and I'm using a very sharp scalpel, but it makes my hands sore making sure I keep to the pattern exactly. I cut on every line, with the curlies getting cut on each side so that there is a thin curly line of glass exposed.
 When I finish cutting each line, I peel off the beginning sections. If I were surface etching, I'd peel the whole design off and do a fine sandblast over the exposed areas, but s ince I'm deep carving, I can only do a section at a time so that the sections adjoining will be a different depth to the ones I've carved before.
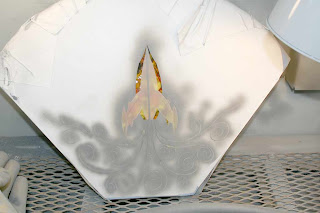 Here, I've sandblasted the curlie-Q's and part of the rocket. If you look closely, you can see that the interior sections of the rocket have been sandblasted, but the exterior sections are still smooth shiny glass, and the very center line still has the mask over it. Now, when I blast the exterior sections, they'll go a little deep, but the interior will go even deeper, leaving a line between the two on each side. After that, I'll pull the center strip and give it some more blasting. This will result in a four-level carved rocket.
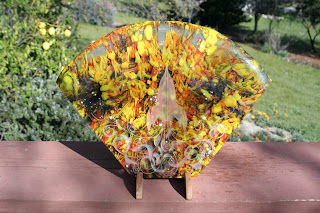 Here is the finished piece with the carved rocket subtly engraved into the front. It would make a perfect top stone for a fireplace surround.
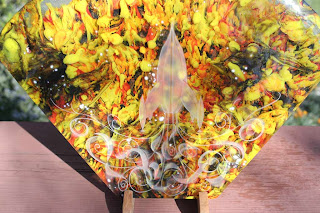 This is a close up of the rocket carving. You can see multiple levels in the rocket itself, plus multiple levels in the curlie-Q flames. It turned out extremely nice, with no oversprays, no gaffes. It took a day for the sketching and mask cutting, but only a few hours for the actual carving.
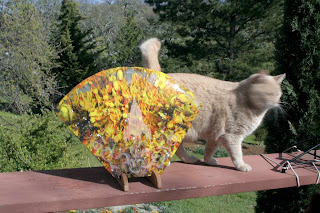 This is my curly-tailed kitten, Dobby. Couldn't for the world get him to stop moving long enough for the photo. He's a wiggle worm!
What would you use this piece for? Counter insert? Cutting board? Fireplace tile? Freestanding art? Give me some ideas!
Since I was getting ready for a space conference, I decided to go with a spacey design. I had a section of glass that for all the world looks like boiling fire, so chose to carve a rocketship taking off into the front of it. This would be just a display piece, as an example of the type of work we can do on countertops, sinks, doors, etc.
So, first I had to come up with an idea. I chose to make a stylized rocket, like the '50's rockets with fins.

This is my initial sketch. Since the sides had to mirror each other, I mostly just worked up one half.
 I then worked on the flame blast that would go under the rocket. The piece of glass I have is triangular shaped, so the curlie-Q's contrasted that hard edge wonderfully.
 Here is the actual glass, all polished, trimmed and ready to be covered with the resist so that the sandblasting only affects where I want it to. It's a gorgeous piece with reds, yellows and blacks bubbling up and crashing through the surface. As the piece finished casting, the colors set and the surface flattened down to be completely smooth - a perfect surface to etch and carve into. It is about 18 inches across by about 16 inches deep, weighing about 15 pounds.
 I've transfered the sketch in great detail and have now started cutting the resist by hand. It's a thin vinyl and I'm using a very sharp scalpel, but it makes my hands sore making sure I keep to the pattern exactly. I cut on every line, with the curlies getting cut on each side so that there is a thin curly line of glass exposed.
 When I finish cutting each line, I peel off the beginning sections. If I were surface etching, I'd peel the whole design off and do a fine sandblast over the exposed areas, but s ince I'm deep carving, I can only do a section at a time so that the sections adjoining will be a different depth to the ones I've carved before.
 Here, I've sandblasted the curlie-Q's and part of the rocket. If you look closely, you can see that the interior sections of the rocket have been sandblasted, but the exterior sections are still smooth shiny glass, and the very center line still has the mask over it. Now, when I blast the exterior sections, they'll go a little deep, but the interior will go even deeper, leaving a line between the two on each side. After that, I'll pull the center strip and give it some more blasting. This will result in a four-level carved rocket.
 Here is the finished piece with the carved rocket subtly engraved into the front. It would make a perfect top stone for a fireplace surround.
 This is a close up of the rocket carving. You can see multiple levels in the rocket itself, plus multiple levels in the curlie-Q flames. It turned out extremely nice, with no oversprays, no gaffes. It took a day for the sketching and mask cutting, but only a few hours for the actual carving.
 This is my curly-tailed kitten, Dobby. Couldn't for the world get him to stop moving long enough for the photo. He's a wiggle worm!
What would you use this piece for? Counter insert? Cutting board? Fireplace tile? Freestanding art? Give me some ideas!
Wednesday, March 18, 2009
How Fast Can You Paint?
I have never been a fast painter. I see friends who bang out piece after piece during a day. Why can't I get the hang of trusting what I feel and slapping it down? Instead, I tend to linger, plot out the strokes, the colors. In the end, I often end up ruining a perfectly good painting by overworking it. Being a good artist is also knowing when to quit, so I guess I'm not such a good artist sometimes.
But the trouble is that it's the sections of the paintings... One will be completely done while another is barely started. So I guess my brain says that since I'm still working on the painting, I can go back to the done section, and that's where the trouble comes in.
I need more practice at doing quick works. When I was in college, we did a lot of gesture drawings. The teacher would put us on the clock, giving us 5 minutes, then 2, then 1 to do full page (18 x 24 inch) drawings. You didn't have time to think about stuff too much. You were forced to quickly reconcile what you were looking at and get your hand moving to capture it. And it got me a lot more comfortable with laying down rich, thick lines instead of the barely visible itty bitty sketches I was doing before.
I need to do that with my watercolors. Some of the pieces I've shown here were done fairly quickly, so I know I have it in me to trust what I'm doing, I just need to convince the rest of my head to trust as well.
So, I am going to start a series of small paintings, called ACEOs (art cards, the size of baseball cards) where I am going to do more gestural type works.
I'll start posting them as I get them done - first one in three weeks! Just kidding!!!! first one tomorrow at the latest is what I'm hoping for.
What tips do *you* have for speeding up artwork? For trusting your own instincts? Help me out!
Peace,
Joy
Saturday, March 07, 2009
Next for the Orrery Project
Previous posts have focused on the rocket that is the center column for our orrery. The one pictured here doesn't have the bottom section with the fins, but our new one does. Now that the rocket has been carved and the holes bored into it to accept the drive tubes, it can be put aside for a bit and we move on to the next section - The arms.
 You can see here that each planet has its own arm. The rocket is cut into little sections so that each arm will spin freely on a bearing between the rocket sections. So it's time to craft the arms. While the arms are being built, the planets can also be blown. If we have some good weather, we'll get going on that too.
Back to the arms. They need to be very strong - the piece is going into a college, where no doubt, there will be drunken college students attempting to take Jupiter home with them. A lot of thought and design has gone into this orrery to make it "Student-Proof", as best we can anyway... Since they're pretty thin, we've chosen to make the arms out of carbon fiber (what they make jet fighters out of, and the new SpaceShip One) It's extremely sturdy, and very lightweight. Lightweight matters because the planets themselves, being blown glass, are going to be on the heavy side and we want to make sure all that weight off of one side of the rocket doesn't screw up its ability to spin freely, so wherever we can make something lighter, it's a good thing.
But how do we make an arm from this mystical "Carbon Fiber"? We can get CF in various forms from online stores that sell to homemade airplane makers, or car hobbiests. It comes in rod, tube, tape or a fabric. Hmmm.... Fabric.... I used to work professionally as a costume designer for theatres, and have worked with fabric all my life. I could use my fabric knowledge with this new technique! How hard could it be?
You can see here, the feather spars I built for our mobile projects. The longest is about 16 feet long! The largest is about 4 inches wide by 3/4 inch thick at the tube. Only about an 1/8 inch thick on the feather.

Now here is a closeup of those feather spars before I did the final trim work on them. You can see that it is a cross weave fabric. It's a very thick fabric, and the weave is loose so it tends to wiggle all over the place. It is also highly toxic, so gloves, goggles and a mask are required. I first make a long pattern of what the full piece needs to be and then carefully cut the CF to match.
The feather shape is laid out on plastic in a specially designed mold that will hold it in its "feather" shape until it's set. It is wrapped around a central tube, which gives it stability and also a way for us to pass the wiring needed for each planet, and then soaked with a two part epoxy glue. The plastic is then rolled over the top, sealing the piece inside. I then squeegee out the excess glue and smooth it under the plastic so that there aren't any bubbles or dry spots. I add weights to hold it in the tight curve shape. Then it's just a matter of waiting for the epoxy to set up. I check on it often during the next 12 hours to make sure nothing is coming loose or slipping. I will use this same technique for the orrery arms, but on a smaller scale. The longest arm is only 3 feet long, with a gentle curve to it, and fairly thin - it will be under 3/8 inch thick. I plan on squeezing the pieces towards the inner part of the curve to that when I trim and clean it up, it won't be as visible as it would be on the outside where people are seeing it more.
That's the plan. We'll see how it goes! How hard could it be?
Peace,
Joy
 You can see here that each planet has its own arm. The rocket is cut into little sections so that each arm will spin freely on a bearing between the rocket sections. So it's time to craft the arms. While the arms are being built, the planets can also be blown. If we have some good weather, we'll get going on that too.
Back to the arms. They need to be very strong - the piece is going into a college, where no doubt, there will be drunken college students attempting to take Jupiter home with them. A lot of thought and design has gone into this orrery to make it "Student-Proof", as best we can anyway... Since they're pretty thin, we've chosen to make the arms out of carbon fiber (what they make jet fighters out of, and the new SpaceShip One) It's extremely sturdy, and very lightweight. Lightweight matters because the planets themselves, being blown glass, are going to be on the heavy side and we want to make sure all that weight off of one side of the rocket doesn't screw up its ability to spin freely, so wherever we can make something lighter, it's a good thing.
But how do we make an arm from this mystical "Carbon Fiber"? We can get CF in various forms from online stores that sell to homemade airplane makers, or car hobbiests. It comes in rod, tube, tape or a fabric. Hmmm.... Fabric.... I used to work professionally as a costume designer for theatres, and have worked with fabric all my life. I could use my fabric knowledge with this new technique! How hard could it be?
You can see here, the feather spars I built for our mobile projects. The longest is about 16 feet long! The largest is about 4 inches wide by 3/4 inch thick at the tube. Only about an 1/8 inch thick on the feather.

Now here is a closeup of those feather spars before I did the final trim work on them. You can see that it is a cross weave fabric. It's a very thick fabric, and the weave is loose so it tends to wiggle all over the place. It is also highly toxic, so gloves, goggles and a mask are required. I first make a long pattern of what the full piece needs to be and then carefully cut the CF to match.
The feather shape is laid out on plastic in a specially designed mold that will hold it in its "feather" shape until it's set. It is wrapped around a central tube, which gives it stability and also a way for us to pass the wiring needed for each planet, and then soaked with a two part epoxy glue. The plastic is then rolled over the top, sealing the piece inside. I then squeegee out the excess glue and smooth it under the plastic so that there aren't any bubbles or dry spots. I add weights to hold it in the tight curve shape. Then it's just a matter of waiting for the epoxy to set up. I check on it often during the next 12 hours to make sure nothing is coming loose or slipping.
 I will use this same technique for the orrery arms, but on a smaller scale. The longest arm is only 3 feet long, with a gentle curve to it, and fairly thin - it will be under 3/8 inch thick. I plan on squeezing the pieces towards the inner part of the curve to that when I trim and clean it up, it won't be as visible as it would be on the outside where people are seeing it more.
That's the plan. We'll see how it goes! How hard could it be?
Peace,
Joy
Sunday, March 01, 2009
More Little Watercolors
I've gotten a great response for the little watercolor I posted of Shadow, so here is another one I did a bit ago. This is of Larry, our beautiful Maine Coon tuxedo boy. He is from a kaboodle of 5 abandoned kittens we rescued (yes, we're suckers for cuties....)
 This piece is only 6 inches wide, and really captures his eyes. I really like the super closeups, if I can get them to pose for that long, but Larry happens to be one of the most easygoing cats I've ever had, so it's easy. I just have to tell him he's adorable, and he flops down and goes into some really cute pose.
Since my watercolors are only personal projects so far, I don't often get time to work on them. Paying jobs come first. Today, it's raining and dreary though, so maybe I'll take some time, get a mug of cocoa, put on my slippers and lose myself in some little paintings.
Yes, that sounds like a really good plan.
Please post a comment here and on facebook. I'd love to hear what you think, suggestions....
Peace,
Joy
Thursday, February 26, 2009
Focus on OneThing, or Many?
Is it better to focus on one thing, or allow yourself to do many different things? There is usually a consensus that if you do one thing, you do it well. If you branch out, you'll never be a master at anything.
I don't know if I agree with that or not. Sometimes, I feel like if I did just focus on one thing, I would get extremely good, but I just don't have the attention span for it. When my brain is working on a painting and gets stuck, it helps tremendously to go and do something completely different. It's like it lets that part of my brain sleep and recover and then can wake up with new ideas, while the rest of me is still creating.
Here are some extremes:

This is an itty bitty painting, only 6 inches across, done in watercolor. It is of my beautiful little cat, Shadow. Painting releases stress for me, and I tend to get lost in a painting and the time flies by.
The other extreme: Big friggin glass sculpture
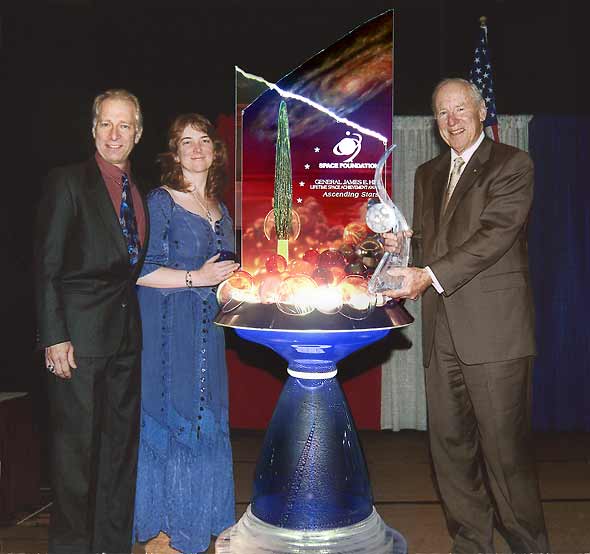
This big thing is the Lifetime Space Achievement Award for the Space Foundation. That's me and my partner, BJ, with award recipient Jim Lovell. Jim is holding the individual award that he gets to keep. (It's on display at his restaurant north of Chicago)
This type of building feeds the engineering part of my brain. Figuring out how things will fit together, and then creating the pieces and carving them to complete a larger whole piece is more complicated, requiring me to keep a lot of portions in my head at a given time. The thing I *don't* like about this process is that I'm really bad at seeing progress. I see things finished. If I'm making slow progess, I tend to get discouraged and think I'm not getting anything done. And than all of the sudden, one day the whole thing gets done, like a surprise to me.
I certainly don't think I'm a master at any one thing, but I *do* think I'm pretty darned good at a number of things, and if I had to choose which one to focus on and become a master at, I think I'd go insane. Also, given my temperament, I *still* don't think I'd become a master at the one thing. I'm just too hard on myself. And anyways, I feel like if you finally DO think yourself a "Master," then you're closing yourself off to growth and learning, and what fun is that?
What do you think? Do you have experience with Many vs. One? Please post a comment.
Peace,
Joy
I don't know if I agree with that or not. Sometimes, I feel like if I did just focus on one thing, I would get extremely good, but I just don't have the attention span for it. When my brain is working on a painting and gets stuck, it helps tremendously to go and do something completely different. It's like it lets that part of my brain sleep and recover and then can wake up with new ideas, while the rest of me is still creating.
Here are some extremes:

This is an itty bitty painting, only 6 inches across, done in watercolor. It is of my beautiful little cat, Shadow. Painting releases stress for me, and I tend to get lost in a painting and the time flies by.
The other extreme: Big friggin glass sculpture
This big thing is the Lifetime Space Achievement Award for the Space Foundation. That's me and my partner, BJ, with award recipient Jim Lovell. Jim is holding the individual award that he gets to keep. (It's on display at his restaurant north of Chicago)
This type of building feeds the engineering part of my brain. Figuring out how things will fit together, and then creating the pieces and carving them to complete a larger whole piece is more complicated, requiring me to keep a lot of portions in my head at a given time. The thing I *don't* like about this process is that I'm really bad at seeing progress. I see things finished. If I'm making slow progess, I tend to get discouraged and think I'm not getting anything done. And than all of the sudden, one day the whole thing gets done, like a surprise to me.
I certainly don't think I'm a master at any one thing, but I *do* think I'm pretty darned good at a number of things, and if I had to choose which one to focus on and become a master at, I think I'd go insane. Also, given my temperament, I *still* don't think I'd become a master at the one thing. I'm just too hard on myself. And anyways, I feel like if you finally DO think yourself a "Master," then you're closing yourself off to growth and learning, and what fun is that?
What do you think? Do you have experience with Many vs. One? Please post a comment.
Peace,
Joy
Sunday, February 22, 2009
It's Country Livin'....
Yes, I know I live in the country, so I should expect things like this on occasion, but when they actually happen... It's a bit of a shock! We have a mountain lion. Right here, in our yard.
I have always had a big family of pets. Growing up I had cats, dogs, chickens, guinea pigs, and fish. Now, I have just cats, but a good number of them. Since I live in the country, and we have a pretty big yard, the cats get to go outside during the day. I try to bring them all in at night, since we've heard rumor of mountain lions, and I've seen bobcats, foxes, raccoons, skunks, possum and a slew of smaller critters. A couple of our cats are explorers though, and don't like to come in. They have radio trackers on them so that I can find them easier and bring them in at night. They're not very old, so aren't very "Street smart".
Last night, I went out to find Larry, our beautiful tuxedo Maine Coon. He knows the sound of the radio beeper, so came running from the next hill over, Observatory Hill. I stood on the deck, waiting and watching him running towards me. He got into the gate and stopped cold, looking to the left and then up at me, back to the left, back up at me. He's played this game with me before, where I have to come down and the Chase Is On!! before he'll finally be "caught" and brought in. So I started heading down to get him. It was dusk and he needed to come inside.
As I rounded the big pine tree, I saw what he was looking at. About 20 feet away, a large deer had been killed, partially ripped apart and was laying there. YUCK!!! Larry ran and I had to chase him, but was completely freaked out by what I'd seen, and of course, hearing every twig and leaf crackle as some huge beast right next to me. I caught him and brought him in and BJ and I went out to investigate the deer. Read BJs account here: http://blog.imperialearth.com/
There were large signs of strangulation and it was eviscerated with very large claw marks in it's rump. That was it. I was freaked! I went back in and had a very vegetarian dinner and even locked the doors! Like that would make any difference at all...
Later, as it was dark, I did NOT go outside, but shined a big flashlight down to see if I could see anything. Two enormous glowing eyes shined back at me! YIKES!!!! WHAT THE HECK IS THAT????? It was mostly behind the pine tree, so could only see the eyes. We got the binoculars and watched for a bit. I guess it relaxed that we weren't any kind of threat, so it moved out to where we could see it better, sat down for a while just staring up at us. I was freaked out, but oh my gosh, it was beautiful. It was a huge mountain lion. The tail was a good 3-4 feet long, with a big black tuft on the end. The eyes were about 6 or so inches apart. He was about 20 yards away.
As he sat, he was about 3 1/2 feet tall. After a bit, he turned around, stretched out and laid down. WOW. What a sight!!! Even rolled over on his side, showing off his big tummy! Just Beautiful!!! Tried to take pictures, but it was just too dark. The flashlight wasn't enough for the camera, and neither of us was going to go out for a closer look!!!
All I could do was keep saying "WOW!!" I'd seen them in zoos before, but never one just out in the yard.
After a bit, the wind and rain picked up. I looked again for him, but he'd gone to seek shelter. Somewhere... Then I was freaked out again.
I went down past the tree today, and the deer is still there, moved into the rocks surround now, and more of it eaten. I'm figuring that the lion is still hanging around though.... close to his meal. I started hearing twigs and leaves crackle again, so high-tailed it back into the house. None of the cats have been let out today, cause they'd just be a lion mcnugget in a flash. I'll be watching for him tonight. I sure bet he'll be back.
Peace,
Joy
Thursday, February 19, 2009
The Rocket is Complete!
 The fins are finished! They were cut from solid cherry boards with my radial arm saw and trimmed up with my bandsaw. The blade on that could use some replacing.... Cherry is so hard that mostly the bandsaw blade just burns it while it's trying to cut. Funny, burned cherry wood smells exactly like popcorn. Now I'm hungry!
Anyways, the fins were roughed out with the saws, but then mostly hand carved to shape on a flat belt sander. I often use the end of the sander to do curves and ripples, so used that to get the curve on the underside of each fin to match each other.
They are just loosely propped in place in the photo. I have a lot of work to do on the rocket body before I can finally attach the fins. In fact, since I've taken this photo, the rocket is now cut into its 10 pieces along the guidelines you can see above. Each little piece will then get a slight channel on each end for the bearing that goes between, and then will get a hole bored through the center to accept the guide tube. When they're all cut, the tubes will nest inside each other and rotate on the bearings, hopefully centered on each other .....
I can't yet cut the channels and bore the holes, as my bearings have not yet arrived. So I move on to another section of the project - the motor drive!
Peace,
Joy
Wednesday, February 18, 2009
Continuing the Rocket for the Orrery

It's finally stopped storming, so I can continue to work on building my rocketship today. Why does it matter if it's storming? Some of my equipment (lathe, drillpress among other stuff) is out on a covered deck. The covers keep them protected when it rains, but I'm not too good with my hands when it's cold and wet. I have very low blood pressure, so if my hands get cold, they don't work very well, and that's not something you want happening when you're working with a high speed drill press, or have a large gouge aiming at a huge piece of rapidly spinning wood on a lathe.
So when my hands start giving me trouble, I choose warmer, indoor work, which I certainly have enough of.
But I WANT to get this rocket done! And today is warm(er) and dry, so I'm going to take advantage of it!
You can see in the picture the carved rocket body next to a spare turning block in case I screwed up the first one (and it still isn't too late to do just that....). These pieces are 20 inches long and 4 1/2 inches wide and weigh about 10 pounds each. Pretty massive, really. I drilled the holes for the arms and weights into the top pieces before I turned it (cause once I turn it, I don't have a flat surface to go perpendicular to anymore). I also routed out the channels for the fins before I turned it. You can see the channels at the base of the rocket. There will be 4 fins that I am going to start carving today. Oh, and I'll also sand the top of the rocket to a nice cone.
The rocket and the fins are carved from solid Cherry, a hard and beautiful wood. One of my favorites to work. Once I get the fins carved and fit and make sure that the rocket stands like it's supposed to, I'll start doing more tooling to the rocket body itself, but that's for another post. One thing at a time!
Peace,
Joy
Saturday, February 14, 2009
A Rocket is Born!

I got the rocket carved for the Orrery that we're making!!!! Yay!!! It was cold though, but not raining. You can see me all bundled up. I actually have three shirts on and two pairs of sweatpants, and gloves. I'm coated with sawdust, as is everything else. It gets in my hair, up my nose and under my contacts, but it's actually a lot of fun to get so messy and see something come out of nothing.
The section I'm working on is the top of the rocket. The wide section to my right is the part where the fins will come out. I haven't carved them yet. The dark lines that I'm cutting in the photo is the separations of the sections. I carved the smooth shape of the rocket first and then put in the marking of where the rocket will be cut into 10 pieces.
Why cut it? There's the base piece - the fatter part that the fins will attach to, and then the very top cap which holds the rod to the Sun globe. The other eight pieces are for each of the planets. Each piece will have a rod coming out of it that goes out to hold the planet. You can see that in the website picture.
So after the rocket is carved and sanded, then it is cut into the pieces that can rotate on their own. I'll then take each one of the pieces and drill a hole in the center to hold the tube that goes down to the gearing. Complicated huh? Yes, it makes my brain tired if I think of too many sections of it at a time. I'll most likely start carving the fins tomorrow and figuring out the gearing system (yikes!).
If you like these, please become a follower here.
Peace,
Joy
Wednesday, February 11, 2009
This is Why I Like Being an Artist.
Granted, I haven't tried a slew of different jobs. I did a lot of retail and office work in college, and of course the obligatory doughnut shop waitress in high school (oh, how I hated the smell of doughnuts...). Once I got out of college, I mostly worked for myself, doing costume design for various theatres and then artwork fulltime, never wanting to work for "The Man". I do much better by myself, with maybe a partner, but not a boss.
Mostly, it's the diversity of the life. Recently I've done a lot of glassblowing, and then the subsequent polishing. Some days I get to work on glass casting, some days writing (like yesterday), and today, something totally different -- I get to drill holes into wood to start making a 20 inch carved hardwood cherry rocket! It will be drilled first, because once I do more work on it, I won't have any flat sides to line up with anymore. Then I'll start to turn it on my lathe to get the right shape. I haven't been able to work with my lathe for a long time, so it will be very fun.
When I do lathe work, it's quite messy, with wood shavings going everywhere. It's a loud job, so I get to wear my earphones and crank the tunes. It's outdoors, so I can sing loud with no one being bothered and I get to be in the fresh air (which hopefully will warm up a little by then....). It's fun to see a big ole block of wood shaved down to a sculpture that's hiding inside.
If it gets too cold to do the turning, I'll go down into the shop (which isn't heated, but at least it's enclosed) and start cutting and carving the rocket fins with my macho radial arm saw!
Doesn't get any better than that! OK, maybe if I had a chocolate pizza down there with me.....
Peace,
Joy
Saturday, February 07, 2009
Wine Stopper Collection is UP!

Many of the wine stoppers are now online at http://losturemarbles.com/wine-stoppers.html I have still about 30 of the "Classical" style to polish and then photograph, but there are some real beauties already up. It seemed to take longer to put together the photography and website than it did to blow the glass pieces in the first place, but I guess that's probably because the blowing part was fun and went so quickly. The above wine stopper is in my favorite colors - Violet, Lavendar, and Purple! The violet interior adds sparkles to the whole thing. I love it!

This is one of BJ's ribbon wine stoppers. The way he colors them and then twists them into a ribbon is just amazing. You get the different colors swirling together, but then also you're looking into the ribbon and seeing the other colors on the other side. These are just beautiful and in our "Expressive" category. A wonderful treat for the wine enthusiast.

This beauty is by BJ, but it's using my arrangement of purple colors. It's in our "Elegant" stopper category as it's a large, wonderful piece. BJ used a mold to create lines of color and then added a bubble to the end of each, circling the whole piece. It's a great effect and makes an awesome work of art, and doubles as a useful wine accessory! Doesn't get any better.
I hope you like these additions and check out all the others on LostureMarbles.com. I'll extend a special I have running for my facebook fans to here - 15% off your order, just type in "facebook" into the coupon box on the order form.
Now, I'm off to polish more Classicals!
Peace,
Joy
Sunday, February 01, 2009
More Amazing Wine Stoppers

OK. How much fun are these???? This one is one of my favorites today. It's on the larger side, nearly 2 1/2 inches wide, with blues, creams and some wispies of purple floating through. It's just outright gorgeous under a light or in the sun. Wow!

This one is fun too. I asked a friend what her favorite colors were and she said "Purple, purple and more purple!" Oooh, those are three of MY favorite colors too! So I had fun with this one, incorporating an opal lilac, lavender and a rich violet. MMmmm. Yummy!

This one came after the rich dark purple ones. It uses a bit of the violet, but then adds some alabaster and a little bit of a sky blue. Very pretty -- it's soft, subtle and elegant.

And then there was this one!!! How much fun is this??? It's Garnet and Gold, with then the creamy pink added in. I swirled it differently so that the trailing ends would look like tendrils or flames. Very effective!!! This is the first of this technique and BJ came out and said "Show Me HOW!!!" cause it was just so darned cool.

But he never does anything small! This one is a beauty though, at a little over 3 1/2 inches tall. It has emerald and golden yellow, with some shoots of brilliant blue. He mixes and twists the colors and then puts the pattern on the outside and the twist so that it looks like ribbon. Mesmerizing with all the little details.
And the stopper bottoms are made of stainless steel, so it will never rust or pit or anything, no matter what kind of bottle you are stopping. It has rings of rubber to hold it securely in place.
Getting the cart, pricing and website set up takes a long time, especially when most of the day is spent processing the photos and movies and doing the photography itself. I think BJ is getting the site about ready to put up though, so it shouldn't be long now. As for pricing, they're going to be in the range of $65-75 for the regular ones and up to $125 or so for the larger ones. If you'd like to get one before the site goes up, just send me an email with which one you like and I'll send you a private link to be able to purchase it. And they're signed by us, so will only increase in value as works of art.
Let me know what you think of them.
Peace,
Joy
Monday, January 26, 2009
The Trouble Is....
I threw my shoulder out this past week. I have pulled muscles before, but this was just excruciating. Still not quite sure what exactly I did, but wow was it sore! I couldn't raise my arm, nor turn my head and my entire right side was aching with a splitting axe going through my right eyeball.
So, I was on codeine (and now vicodin!) for this past week. The trouble is that we have been blowing glass bottle stoppers for the past two weeks and it's now up to me to do the cleanup so that we can photograph them. But doing the cleanup is so painful right now!!! OUCH!!!
I have a few of them done, so BJ has taken the photography of those, but there are so so so many more on my table. And they're all just so beautiful!!! Here's a few:
This one is one of mine, emerald green, medium blue and a wisp of golden. It's very nice, and I made it so it would slightly flare out from the wine bottle.
 This one is like my marbles, using a pink/ivory with an overlay of red dots. The pink/ivory swirls on the inside and gives off somewhat of a golden tone. It would be fantastic on a chardonnay bottle.
 Now this one is one of BJ's. He just can't seem to grasp the concept of "reserved" or "small". He just loves to stretch the glass to see how far he can go with it. This one is very special to him. It uses reds, the pink/ivory and a few other hints of color and then swirls and twists it up so that it looks like the wine is splashing out of the bottle. It's a wonderful technique and makes for some very interesting and fun shapes.
Now I just have to take enough vicodin so that I can clean up and polish the rest of the pieces!! You won't believe those. They're just friggin amazing.
Tomorrow... I swear tomorrow....
Peace,
Joy
So, I was on codeine (and now vicodin!) for this past week. The trouble is that we have been blowing glass bottle stoppers for the past two weeks and it's now up to me to do the cleanup so that we can photograph them. But doing the cleanup is so painful right now!!! OUCH!!!
I have a few of them done, so BJ has taken the photography of those, but there are so so so many more on my table. And they're all just so beautiful!!! Here's a few:
This one is one of mine, emerald green, medium blue and a wisp of golden. It's very nice, and I made it so it would slightly flare out from the wine bottle.
This one is like my marbles, using a pink/ivory with an overlay of red dots. The pink/ivory swirls on the inside and gives off somewhat of a golden tone. It would be fantastic on a chardonnay bottle.Now this one is one of BJ's. He just can't seem to grasp the concept of "reserved" or "small". He just loves to stretch the glass to see how far he can go with it. This one is very special to him. It uses reds, the pink/ivory and a few other hints of color and then swirls and twists it up so that it looks like the wine is splashing out of the bottle. It's a wonderful technique and makes for some very interesting and fun shapes.Now I just have to take enough vicodin so that I can clean up and polish the rest of the pieces!! You won't believe those. They're just friggin amazing.
Tomorrow... I swear tomorrow....
Peace,
Joy
Saturday, January 24, 2009
A Marble in its new home

This beautiful green marble now has a home on the east coast. The setting is gorgeous letting the sun come in. We consciously made the choice to have our marbles be translucent, transparent in places rather than solid opaque, so that you could see through to the other side to get more intricate things going on in each, plus the light being able to shine through is just spectacular. I'm so happy this one has such a nice home with such loving people. It's owned by an amazing artist who has quite a history of doing incredible work - Roy Scarfo and his wife, Carol.

This great marble is now owned by artist David A. Hardy, travelling halfway around the world to its new home, to be surrounded by dinosaurs and space art from a long history of David's creations. Its little bubble eyes in the blue remind me of Wall-E, and I'm so happy he has such a good home now. It's always fun to see where our creations go, how they're used or displayed. More often than not, we send them out and never see or hear from them again. It's a treat to see and know that they're received and loved. Thank you, Dave and Carol, for sending us these photos.
Peace,
Joy
Tuesday, January 20, 2009
Massive Sale
In honor of our new President (YAYYY!!!), we're having a massive sale on all our stuff. It's 30% off! Can you believe that? Outrageous!
Anyhoos, anything on any site we have can get the discount.
Spherical Magic - http://sphericalmagic.com/
My site - Glass Nebula - http://glassnebula.com/
Our marbles - Losture Marbles - http://losturemarbles.com/
BJ's work - http://imperialearth.com
and even my cat bowls - http://MyCatsCradle.com/
Just enter the code "Yes We Can" into the cart and it will give you the discount.
Send me a note if you don't see something you know I've talked about, like the new winestoppers...
Peace,
Joy
Monday, January 19, 2009
Commissioned VS. Personal Art
I often get asked, and wonder myself too, do I prefer commissioned works or making my own pieces to then sell. Many artists refuse to take commissions, feeling that it will compromise their artistic integrity. I can see their point, but if you work with your client right, this doesn't have to be the case.
Commissioned work is fine with me, as long as I can get along with the client. I certainly like being paid up front and having a solid job as I work. If the piece comes out different than originally thought up, I can chalk it up to experience and learning and start another one that will be the commissioned art piece.
If the piece is close to what was commissioned, and I feel it's a better work of art, I'll talk with the client, explain my views and usually the client agrees and accepts the piece. I don't think I've ever had a client that refuses and wants their money back. One was very close, but after a week, she called back and said she wanted it after all!
As for personal works, I do like to work on these, as they let my creativity go where it needs to go. Sometimes commissioned works can be this way, if the client says "Whatever you want to do!" (And I just LOVE those clients!!). I have so many interests and so many techniques available that I never run out of ideas for personal works. In fact, I have so many projects going, it is sometimes overwhelming! Sometimes, they sell and sometimes they don't. That's the rough part - not knowing if all the work I'm putting in will help me continue as an artist. I guess that's why some of the projects still sit, months and years after I started them, unfinished. I don't know if they'll sell, so I feel guilty about spending time working on them.
I wish I had the freedom to just paint or build what I want without having to worry about the business end of it, but I guess very few artists ( or anyone for that matter) has that kind of freedom, so I'm not alone.
Peace,
Joy
Wednesday, January 14, 2009
Why I Like Working in Glass
I've worked in other mediums (media?) but have found a strange quirk in myself that is really irritating - I fiddle. Yes, I play the violin, but I also just keep nerdling on things forever. When I work in traditional oils, I would keep going in and redoing things until all I had was just a mess. When I started reverse painting on glass, I was not able to keep fiddling with the work and finally it would be finished.
Why? Well, reverse painting is done the opposite way of traditional. I *start* with the foremost details and then work my way back to the background color. I have to sign the painting near the beginning, and as each layer goes on, the previous layer is covered up on the glass and so I can't go back and work it anymore. It forces me to complete the painting. If I finally decide that the painting just isn't working, I have to scrape the whole thing and start over. The pain of doing that is usually too great, so I just let the painting be what it is and move on to the next.
The same is pretty true with glassblowing. Of course, we plan out the colors we will use and the basic design and shape and function, but as the glass is molten, we can't go in and really tweek anything if it's going different from planned. Sometimes that's the best thing too! We'll be working on a specific design and the glass will start to go a different direction. We are learning to be flexible enough to say OK and take it in the new direction to see what it wants to be.
This has been a really hard thing to learn too, to NOT force control over the glass. Sure is fun and cool when it works though!
Peace,
Joy
Sunday, January 11, 2009
I Get To Blow Glass Today!! WooHooOOOoo!!!
I don't get to blow glass very often, so when I do, it's a real treat.
But wait, if I like it so much, why don't I do it more often? Well, if I ONLY blew glass, I'd do it every day (or most days...). BJ and I are very diversified though. Along with the glass, we paint, build sculptures (out of the glass we blow), build furniture, websites, 3D modeling and animations, plus lots of other things.
Probably tomorrow or Tuesday, I'll have to spend a large chunk of the day printing, matting and then framing one of our artworks. Plus I do a lot of marketing and all the office work (bills, invoices, mailing lists, yadda...). On the days I blow glass, it pretty much takes up the entire day. If I have to do anything over a couple of hours (framing, errands, meeting, sick cat....) I can't blow that day.
A Day of Blowing:
11PM the night before: I fill the furnace with batch (crushed clear crystal) and start the firing. It takes 15 hours and heats up the glass to a molten 2175 degrees!
1AM: Go to bed!
9AM: I get up, infuse myself with tea and wake up with email and cnn.
10 or 11: Get to do a little work on other projects - maybe do a print, glue up some wood, a little carving, get shipments ready, etc.
1PM: My partner, BJ Johnson, arrives at the studio. He fires the Glory, which takes about an hour to get to 2000 degrees.
2PM: We go out to start. BJ cranks up the lights, the pipe warmer and gets the tools waxed and ready. I fire up the annealer. It heats up to 975 degrees in about 20 minutes. I also crank up the tunes on my ipod through the speakers. And we're ready to blow!!!
8PM!! We finally call it a day, ready to go in, make dinner and vegetate a bit. The glory is turned to low and the furnace allowed to cool to about 1200 degrees, so that I can fill it back up at 11 and start again!!
It's a full day, exhausting, exciting.
Comment, please, ask questions.
Peace,
Joy
Monday, January 05, 2009
Three New Marbles

This is a wonderful paperweight. It's 2 inches across and is really fun with the little bubbles inside. It's on ebay:
http://cgi.ebay.com/ws/eBayISAPI.dll?ViewItem&ssPageName=STRK:MESELX:IT&item=250352945066
for just ridiculously inexpensive.
There is also this one:
 which is very pretty with the deep gold and the ivory mixing together. It's at an even more ridiculous price on ebay: http://cgi.ebay.com/ws/eBayISAPI.dll?ViewItem&ssPageName=STRK:MESELX:IT&item=250352950424
And also this one, which is my favorite (so far...) :

This one is just really cool. The blue is textured like alien skin, and then it has two eyes (bubbles) at the very top, exactly spaced in the blue. The salmon pink and the transparent violet swirl up and wrap around the blue. It's a great combination of colors and very pretty. I'm going to go for this combo again the next time we blow. I think I can do some even cooler things with it. Yes, it's on ebay too: http://cgi.ebay.com/ws/eBayISAPI.dll?ViewItem&ssPageName=STRK:MESELX:IT&item=250352956760
Peace,
Joy
Friday, January 02, 2009
Happy New Year
I hope you all have a good new year. This past year was difficult for me, and I'm still digging out of it. I go from great hopefulness to near tears, but I think the hopefulness is winning out. Even though things are tough, I feel like my artwork is beautiful and it is surely what I'm supposed to be doing.
but sometimes I get so lonely.
wishing you the best of success this coming year.
Joy
but sometimes I get so lonely.
wishing you the best of success this coming year.
Joy